绘制文字
使用draw_text()和draw_rect_text()函数,我们可以绘制文字。
这些函数与python的内置函数print()类似, 你可以在一次函数调用中提供多个对象进行打印:
from easygraphics import *
def main():
init_graph(400, 50)
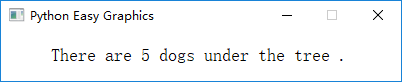
draw_text(50, 30, "There", "are", 5, "dogs", "under", "the", "tree", ".")
pause()
close_graph()
easy_run(main)
运行上述程序将获得如下的结果:
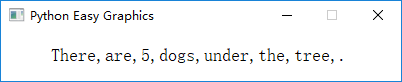
如果你需要使用其他字符代替空格作为字符串之间的分隔符,可以使用”sep”参数:
from easygraphics import *

def main():
    init_graph(400, 50)
    draw_text(50, 30, "There", "are", 5, "dogs", "under", "the", "tree", ".", sep=",")
    pause()
    close_graph()

easy_run(main)
上面程序的结果如下:
文本绘制的位置
使用draw_text()是,前两个参数x,y指明了绘制文字时的“起始位置”,该位置是文字外廓的左下角。
因此下列代码将文字绘制在了绘图窗口的外面(在窗口中看不到):
from easygraphics import *

def main():
    init_graph(500, 200)
    draw_text(50, 0, "Hello world!")
    pause()
    close_graph()

easy_run(main)
在指定的矩形区域中绘制文字
使用draw_rect_text(),我们可以在一个指定的矩形范围内绘制文字。
注意函数的前两个参数(left,top)是矩形的左上角(和draw_text()不一样),第3、4个 参数(width, height)是矩形的宽和高。
你可以使用flags参数来控制文字的对齐方式。
如果指定的矩形不足以容纳整行文字,多余的文字会被截掉。
如果设定了标志“TextFlags.TEXT_WORD_WRAP”,并且文字太长一行放不下,会自动换行。
from easygraphics import *
def main():
init_graph(400, 300)
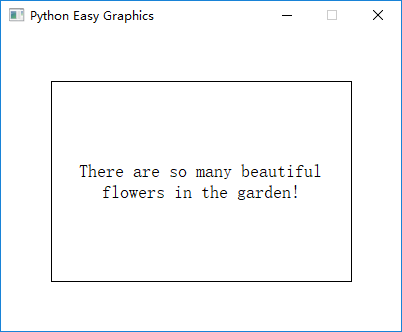
draw_rect(50, 50, 350, 250) # draw a border to better see the result
draw_rect_text(50, 50, 300, 200, "There are so many beautiful flowers in the garden!",
flags=TextFlags.TEXT_WORD_WRAP | TextFlags.ALIGN_CENTER)
pause()
close_graph()
easy_run(main)
以下是上面程序的运行结果。注意我们用draw_rect()在文字矩形框外绘制了边线,以便更好的展现flags参数的效果。