几何变换(Transforms)
Easygraphics(和其使用的Qt系统)支持5种基本几何变换:
- 平移(Translation): 将图形上的各点向同一方向移动相同距离。
- 旋转(Rotation): 图形上各点在保持相对位置固定的同时,围绕一个定点运动。
- 缩放(Scaling) : 在各轴方向上分别将图形放大(enlarge)或缩小(shrink)相应的倍数(factor)。
- 错切(Shear Mapping) : 是 一种线性映射,将形状上的所有点向一个方向推移,推移的距离与各点到与该方向平行的一条直线的距离成正比。
- 反射(Reflection): 图像通过一条直线(对称轴)变换成它的镜像。原图像上各点到对称轴的距离,和其在镜像上对应点到对称轴的距离相等。
下面的代码绘制了一辆简单的公共汽车。我们用它为基础,与本节中后续例子进行比较。
def draw_bus():
    """
    Draw a simple bus
    """
    set_color("lightgray")
    rect(60, 20, 270, 150)

    set_color("red")
    set_fill_color("blue")

    draw_circle(120, 120, 10)  # draw tyre
    draw_circle(200, 120, 10)  # draw tyre
    rect(80,40,250,120)

    # draw window
    x = 90
    while x < 175 :
        rect(x, 60, x+10, 70)
        x += 15

    # draw door
    rect(220, 60, 240, 120);
    line(230, 60, 230, 120);
    circle(230, 90, 5);
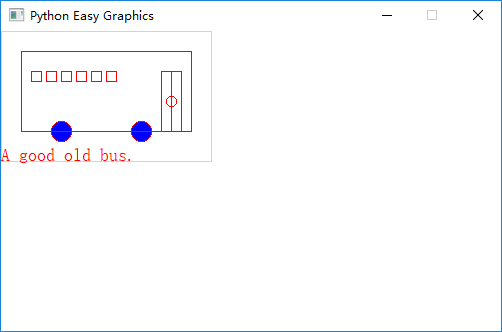
下面的程序绘制一辆未经变换的公共汽车。
from easygraphics import *
import draw_bus


def main():
    init_graph(500, 300)
    draw_bus.draw_bus()
    pause()
    close_graph()

easy_run(main)
平移(Translation)
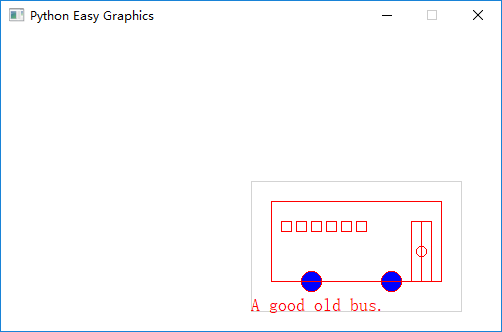
平移是最常见的几何变换。它将图形上各点在x轴方向上同时移动offset_x距离,在y轴方向上同时offset_y距离。也可以理解将原点和坐标系在x轴和y轴方向上分别移动了offset_x和offset_y。
下面的程序使用translate()函数来将坐标轴原点移动到绘图窗口的正中央,然后绘制公共汽车。
from easygraphics import *
import draw_bus

def main():
    init_graph(500, 300)
    translate(250, 150)
    draw_bus.draw_bus()
    pause()
    close_graph()

easy_run(main)
注意:set_origin()是translate()函数的别名。
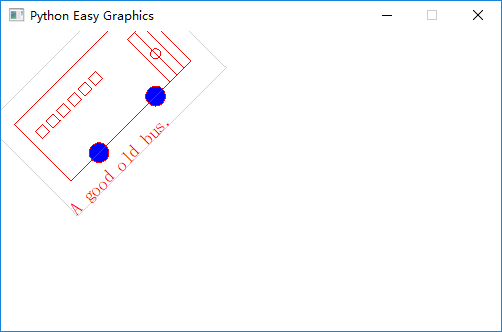
旋转(Rotation)
使用rotate()函数来将坐标系绕点(x,y)进行顺时针旋转。
注意:rotate()函数和形状绘制函数(如draw_pie()等)中的角度方向是反的!
如果要作逆时针旋转,给一个负的旋转角度即可。
下面的程序中绘制了一辆绕其中心(105,65)逆时针旋转了45度的公共汽车
from easygraphics import *
import draw_bus

def main():
    init_graph(500, 300)
    # rotate around the (105,65)
    rotate(-45, 105, 65)

    draw_bus.draw_bus()
    pause()
    close_graph()

easy_run(main)
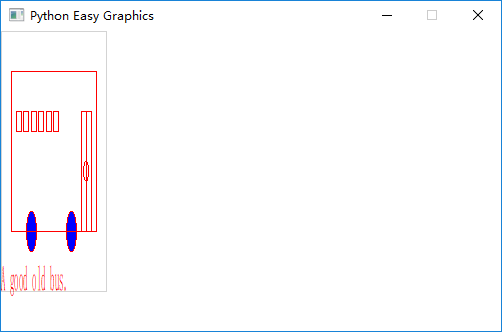
缩放(Scaling)
我们可以使用scale()函数来对图形在x轴和y轴方向分别进行缩放。
下面的程序绘制了一辆在x轴方向上缩小,在y轴方向上放大的公共汽车。
from easygraphics import *
import draw_bus

def main():
    init_graph(500, 300)

    scale(0.5, 2)
    draw_bus.draw_bus()

    pause()
    close_graph()

easy_run(main)
错切(Shear Mapping)
我们使用shear()函数或它的别名skew()来围绕点(x,y)对图形进行错切。shear()需要两个参数”sv”和”sh”。错切时,原图上的每个点(x,y)被变换到(x+sh*y, y+sv*x)。我们可以通过下面的例子来了解错切的效果。
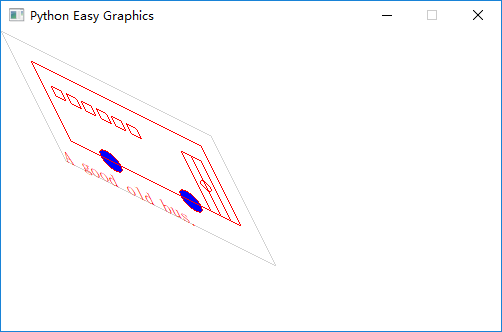
沿X轴方向错切
在下面的例子中,我们沿X轴方向对公共汽车进行错切。注意缺省状态下Y轴正向向下”
from easygraphics import *
import draw_bus

def main():
    init_graph(500, 300)

    shear(0.5, 0)
    draw_bus.draw_bus()

    pause()
    close_graph()

easy_run(main)
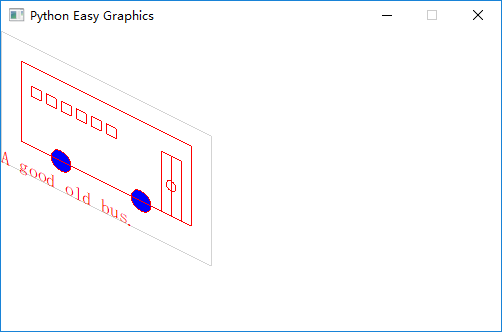
沿Y轴方向错切
在下面的例子中,我们沿Y轴方向对公共进行错切。
from easygraphics import *
import draw_bus


def main():
    init_graph(500, 300)

    shear(0, 0.5)
    draw_bus.draw_bus()

    pause()
    close_graph()

easy_run(main)
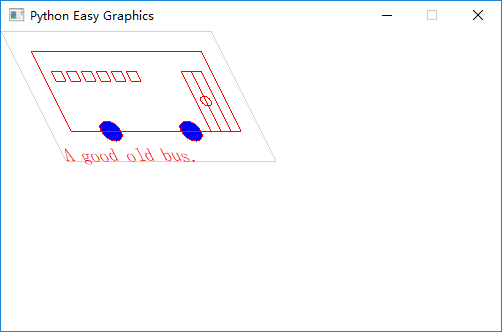
同时沿两轴错切
在下面的例子中,我们同时沿X和Y轴两个方向对公共汽车进行错切。
from easygraphics import *
import draw_bus

def main():
    init_graph(500, 300)

    shear(0.5, 0.5)
    draw_bus.draw_bus()

    pause()
    close_graph()

easy_run(main)
反射(Reflection)
我们可以使用reflect()(或者它的别名mirror()和flip())来生成图像的镜像。它将图像以经过两点(x1,y1)和(x,y)的直线为对称轴进行反射。
以垂直线为轴反射
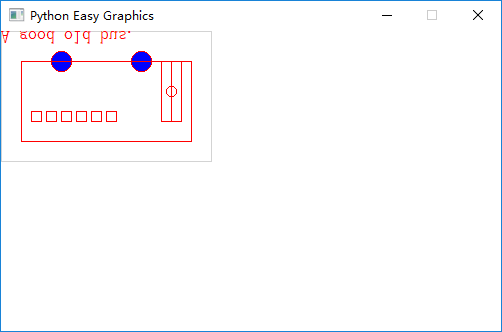
下面的程序将公共汽车进行水平翻转(以公共汽车的垂直中心线x=105为轴进行反射) :
from easygraphics import *
import draw_bus

def main():
    init_graph(500, 300)
    reflect(105, 0, 105, 1)
    draw_bus.draw_bus()
    pause()
    close_graph()

easy_run(main)
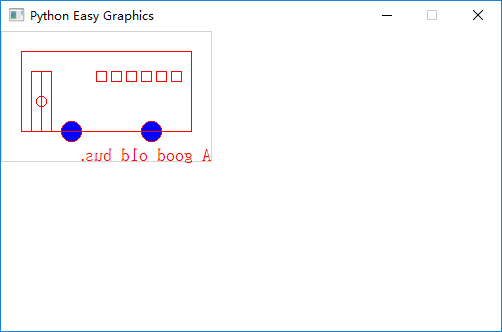
以水平线为轴反射
下面的程序将公共汽车进行垂直翻转(以公共汽车的水平中心线y=65为轴进行反射)
from easygraphics import *
import draw_bus

def main():
    init_graph(500, 300)

    reflect(0, 65, 1, 65)

    draw_bus.draw_bus()
    pause()
    close_graph()

easy_run(main)
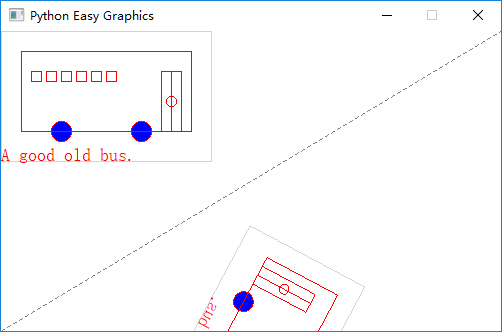
以任意直线为轴反射
下面的程序将公共汽车以经过(0,300)和(500,0)的直线为轴进行反射。为了更好的观察效果,我们先画一辆无几何变换的公共汽车和反射轴,然后画反射后的公共汽车。
from easygraphics import *
import draw_bus

def main():
    init_graph(500, 300)

    draw_bus.draw_bus()

    set_color("gray")
    set_line_style(LineStyle.DASH_LINE)
    line(0, 300, 500, 0)
    set_line_style(LineStyle.SOLID_LINE)

    reflect(0, 300, 500, 0)
    draw_bus.draw_bus()
    pause()
    close_graph()

easy_run(main)
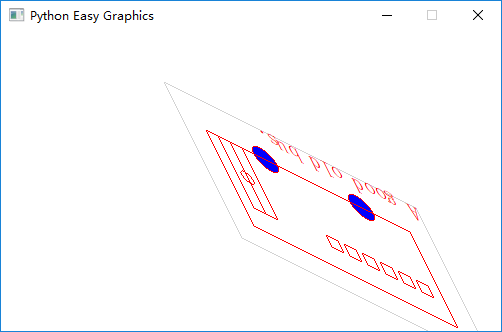
复合变换
几何变换可以进行复合。
在下面的例子中,我们首先将原点移动到绘图窗口的正中央,然后将公共汽车绕其中心旋转,然后对其沿中心错切,最后将其放大1.2倍。
from easygraphics import *
import draw_bus

def main():
    init_graph(500, 300)

    # move the origin to the center of the image
    translate(250, 150)

    # rotate around the bus center
    translate(105, 65)
    rotate(180)
    translate(-105, -65)

    # shear arount the bus center
    translate(105, 65)
    shear(0.5, 0.5)
    translate(-105, -65)

    # scale
    scale(1.2, 1.2)
    draw_bus.draw_bus()
    pause()
    close_graph()

easy_run(main)
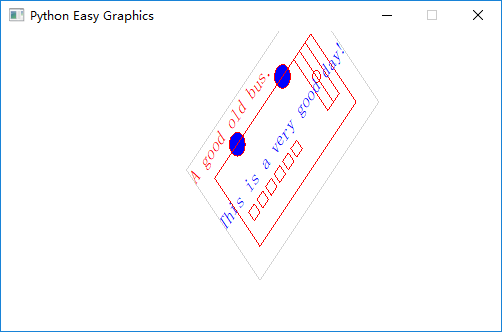
在Y轴向上的坐标系中绘图
你可能已经注意到了,在图片上打开反射(镜像)后,图片上的文字也会被反射绘制。如果你需要按照普通的平面直角坐标系(Y轴向上)绘图,那么这可能不符合你的需要。
Easygraphics专门提供了set_flip_y()函数,来处理这种情况(只翻转图片,不翻转文字)。
需要注意的是,在图片翻转后,所有绘图函数中角度参数的含义也都随之改变。不翻转时,一个正的角度表示顺时针旋转;反转后,正的角度表示逆时针旋转。
下面的两个程序,第一个程序使用set_flip_y()函数来实现Y轴向上;第二个程序使用reflect(1,0)来实现。比较一下它们的结果。
使用set_flip_y()来实现Y轴向上:
from easygraphics import *
import draw_bus

def main():
    init_graph(500, 300)

    translate(250, 150)
    translate(105, 65)
    rotate(-45)
    translate(-105, -65)

    set_flip_y(True)
    # reflect(1,0)

    translate(105, -65)
    shear(0.2, 0.2)
    translate(-105, 65)

    draw_bus.draw_bus()
    set_color("blue")
    draw_rect_text(0, 0, 210, 130, "This is a very good day!")
    pause()
    close_graph()

easy_run(main)
使用reflect(1,0)来实现Y轴向上:
from easygraphics import *
import draw_bus

def main():
    init_graph(500, 300)

    translate(250, 150)
    translate(105,65)
    rotate(-45)
    translate(-105,-65)

    reflect(1,0)

    translate(105, -65)
    shear(0.2,0.2)
    translate(-105, 65)

    draw_bus.draw_bus()
    set_color("blue")
    draw_rect_text(0,0,210,130,"This is a very good day!")
    pause()
    close_graph()

easy_run(main)
